3.31.2011

Our Story

Update: Here's the digital version so ya'll can read it. I had to separate it into two because it was vertically gifted (ahaha, instead of vertically challenged? yeah? no.) Click on each image to view it larger.


I love Taylor Swift's lyrics to Our Song. I think it would be so sweet to have your own love story put into a song for the entire world to hear.

But alas, neither Tyler or I were given the gift of song. I played percussion in high school, but that was mostly playing the music given to me. I can't sing or dance, but fortunately I discovered I can draw and create.

About a year and a half ago I created a poster for Tyler with "our song" on it for our first-year wedding anniversary. I didn't want any of the details of our engagement to be forgotten. (It's kind of funny because my older siblings argue sometimes about how things "really" took place when they met, but it was 5+ years ago for all of them and none of them can remember! I wanted a way to always keep our story straight.)

Hence, this was created:

And I finally framed it. It took me well over a year and a half to print and frame it, but it finally got done! I was so excited to show Tyler yesterday! :)

3.30.2011

DIY Lined Envelopes


To spruce up our graduation announcements, I thought it would be nice to line our envelopes with some decorative craft paper. And boy, did I find the best craft paper! It's BYU-blue, velvety and baroque-like.

Materials needed:
decorative paper
envelopes
pen or pencil
gluestick
scissors
bonefolder (optional, but makes things much easier!)


Directions:
1 Make a template out of cardstock. You can either make your own by tracing your envelope or find a template online. Martha Stewart also shows you how to make one right here.

2 Trace the template onto the back side of your decorative paper, and cut them all out. (I used A7 envelopes and 12"x12" craft paper, and was able to cut out two liners per sheet of craft paper.)

3 Gently slide your liner into the envelope and adjust it where you want it. 

4 Carefully fold over the flap of your envelope and use your bonefolder to make a nice, sharp crease. If you don't have access to a bonefolder, try using a ruler to flatten the creases.


5 Unfold the flap and glue just the top triangle of your paper to the envelope flap.


That's it! Didn't they turn out fantastic? I have heard of people making these for weddings. It does get faster and easier after you've made a few, but I can't imagine making hundreds! Yikes!

3.29.2011

My Herb Garden

I finally decided to grow an herb garden! I've always loved growing basil in the summertime, but this year I decided to branch out. We are also growing oregano, chives (!!), and cilantro. YUM.


I, being overzealous of course, wanted to grow about twenty varieties of fresh herbs, but our budget and the fact that we're moving in a few months won't allow for that. So we're sticking with four. (Although I wish we could have found seeds for mint. I've always wanted to cook with fresh mint.)


We picked up ceramic pots, seeds, and special seed-rooting soil at Home Depot (love that place) and I painted them when we got home. They were going to look much cooler but I got lazy. :)


As for their plant tags, I cut hearts out of the front of the seed packet. Then I glued them onto cardstock and cut out rectangles. I wrote the seed name on the front and their germination time on the back. Then I laminated them using packing tape and stuck them in the soil using toothpicks. (This entire project made me feel like a true homemaker.)


Most of them should be sprouting within one - two weeks, with the latest being 21 days. Waiting for them to sprout is exhilarating. I feel like a little kid all over again!


3.28.2011

Buffalo or Bison?


Buffalo or bison...we're not really sure, but who cares?

My wonderful graphic designer friend Lindsay made this beautiful, flashy print. Isn't it fun and refreshing? The moment Tyler saw it he fell in love, and luckily Lindsay had a few extras so we could have one!

Sadly, I still don't have a place for it on our wall (not in this apartment, anyway) but I'm thinking of putting it in the kitchen when we move to California. And this is its pseudo-frame until we get another one. Right now it's just leaning against our utility room door, but at least we get to look at it everyday. :) Isn't Lindsay talented?

Confessions

I've got a confession to make.

[Sometimes when Jack is fast asleep, I like to stick a binky in his mouth and pretend that he is a baby.]


Shhh. Don't tell my husband. He loves "grown-up Jack".

Is that terrible or what? Jack never liked a pacifier. I feel like I've missed out on that stage of a baby's life because - wait - it never happened! 

One of my favorite baby things to shop for was a binky. I actually get jealous of other people's babies when they are happily sucking away at pacifiers. Sad, huh? It's not that Jack cries a lot and I need to shut him up in public. It's quite the opposite, actually. He is well-behaved most of the time. It's simply that I think binkies are a right of passage. 

And they're so darn cute.

Hmmmph.

3.26.2011

Our Best Bites: Chocolate Chip Cookie Pie


This completely killed any chance at my diet. (Self, be aware that I'm going to exercise triple time to make up for this.) 

But friends, it was soo worth it. Buttery pie crust + warm, melted chocolate chip cookie = a slice of heaven here on earth. (Get it? A slice? Bahaha.)

Tyler's boss had a game night at their house last night and I brought this. My only concern was that the middle never quite set up completely, making it ooey, gooey, warm chocolate chip cookie dough, almost like a pazookie. We decided it might be the altitude (California, you just scored shiny, gold stars in my book for being at sea-level) so to rectify this, just add some more flour to the recipe below. Maybe a 1/4 cup?


Chocolate Chip Cookie Pie

Recipe from Nestle

1 unbaked 9-inch pie crust, homemade or store-bought.
2 large eggs
1/2 C flour
1/2 C white granulated sugar
1/2 C packed brown sugar
3/4 C real butter, softened (1 1/2 sticks)
1 C chocolate chips (semi-sweet or dark works best, you might find milk too sweet)
1 C chopped pecans (you are welcome to make it without nuts)

Vanilla ice cream, or sweetened whipped cream for serving (a must!  I prefer ice cream)
optional: chocolate sauce (honestly, doesn’t really need chocolate sauce, but it looks pretty!)
Preheat oven to 325° F.
Beat eggs in large mixer bowl on high speed until foamy. Beat in flour, granulated sugar and brown sugar. Beat in butter. Stir in morsels and nuts. Spoon into pie shell.
Bake for 55 to 60 minutes or until knife inserted halfway between edge and center comes out clean. Cool on wire rack or serve slightly warmed.  Serve with ice cream or whipped cream.
*From Our Best Bites: There have been several comments about pies turning out runny.  First and foremost, follow the instructions, completely (no margarine or anything from a tub!) I’ve made a million of these and never had that happen so I have no idea.  The recipe is correct as written, it comes straight from Nestle!
*My advice: 1/4 cup more of flour for those of us stuck up here in the mountains. Also, I didn't serve it with ice cream or anything. It was definitely rich enough on its own.

Recipe from Our Best Bites. I am in love with their new website design!

3.24.2011

Kicking (and screaming)


Happy Thursday, everyone! I cleaned the house and I'm making shepherd's pie (with some tweaks here and there to make it lower-fat) for dinner tonight. It should be delicious! {Update: It was delicious! We loved it so much I'm ashamed to admit we ate half the pan. Good thing it is chock-full of vegetables!)


Does Jack really need a haircut? My mom says I'll be one of those mommas who can't bring herself to cut her kiddo's precious hair. So Jack is going to go to kindergarten with his wavy, curly hair down by his bum, but those locks sure will be beautiful.

Just kidding. Tyler would never let me grow Jack's hair out that long. Good thing we have a voice of reason in our family, right?

--------------------

Every morning for the past month or so Tyler and I would wake up to a "clunk, clunk, clunk" sound. Took me a while to figure out that he was scooting around in his crib sideways so he could stick his feet out! The front side of the crib drops down (on hinges - it doesn't slide down) and he's realized if he kicks it, it will go back and forth and makes a great play toy. What a boy.

Unfortunately we had to raise the side back up again so he doesn't get his foot stuck. 
Poor guy. It'll be like this all his life. Once he finally finds something cool it'll just get taken away.


3.22.2011

Graduation Announcement

Remember when I made graduation announcements for us? I'm finally getting around to printing and mailing them (send me your address if you'd like one! alie.jonesy {at} gmail {dot} com). Here's our photo to go with it:
(and here is the announcement in case you missed it. or in case you were so excited for us you wanted to send us on a trip to Greece or somethin'...)
I know it's not exactly "formal" or anything, but if you know anything about us, we're not exactly formal type of people. Here was Tyler's original graduation announcement idea, but being the sensible (and boring?) wife I am I vetoed it. I love my husband.

Our friend Jeff graduated (2 years ago?) and his facebook profile looked like this:
Tyler loved the idea, but me...eh, not so much. Maybe if our announcement was just for Tyler. :)


Hooray for graduation in 3 weeks!

Milk Drunk


Can you say bad hair day? Jack looks at me funny when my hair is every which way in the mornings, but the other day I was the one looking at him funny.

This kiddo's got some crazy hair. And he looks like he's got a milk hangover.

3.21.2011

Tummy Time

It's amazing how quickly tummy time can go from this:

to this and this:


But check out that cute plaid shirt. 

3.18.2011

Dear Blank Please Blank

These are the most creative note cards I've seen in a long time.
I think I want a set to hang on our walls. Maybe in front of me while I'm doing the dishes, or in the bathroom.
(Why the bathroom? Because we used to have a Chuck Norris poster hanging right in front of the toilet in our old apartment. Classy, right? Bet you can't say that about your porcelain throne.)

Kudos to the designers.


3.17.2011

Chicken Fajitas


Tonight I made Chicken Fajitas for dinner. First I asked Tyler what Mexicans put in their fajitas (he served an LDS Mission in Leon, Mexico for two years before we met, so he knows his stuff.) He told me they don't really make chicken fajitas and we've super-Americanized the term fajita.
Sad. No luck there.

Then I was too lazy to find a recipe, so I just started making things up as I went along. (Yes, Mom. I know your jaw just dropped open in surprise, but I really did! And it turned out fantastic!)

It had a little bit of sweet from the raisins and a little bit of smoky flavor from the cumin to it. We'll definitely be making it again soon. Here's the recipe:


Chicken Fajitas
Serves 4
15 minutes or less (!!)


4 chicken tenders (1/2 lb, maybe?)
1 red bell pepper
1 small tomato
1 onion
1/2 can black beans
1/4 c. raisins
large palmful of ground cumin (2 T. maybe?)
small palmful of coriander (1/2 T.?)
s & p

Toppings: 
Avocado
Sour Cream
Pepper Jack Cheese
Tortillas (8)

Chop onion, bell pepper and tomato. Cut chicken into bite-sized pieces. Sautee onion, pepper, tomato, and chicken in a large cast-iron skillet over medium-high heat until chicken is cooked through and onions are translucent. Add beans and raisins and mix well. Add cumin and coriander, and season with salt and pepper to taste. Reduce heat and cook until warm throughout.

Serve with warm tortillas, avocado, sour cream and cheese.

Notes: 
-The raisins sound weird. I know. But I tried a similar fajitas recipe several weeks ago with raisins and I couldn't get it off my mind! Every fajita needs raisins for that sweet punch.
-If I had roasted sweet bell peppers I would have used those instead of a fresh pepper.
-This should easily serve 4 people. If you want to add more chicken, it could serve 6. 
-We used fresh, uncooked tortillas from Costco and cooked them ourselves. Once you've tried them, you'll never go back to store-bought, pre-cooked tortillas!

Blog Header Design

My, my my. I've been so busy lately!

My sister Courtney is the author of Nurturing the Nest blog. She's got really good tips about living every day on a tight budget. She shares recipes, tips, and inspiration she finds for her family on all-natural living. 

I just helped her revamp the look and feel of her blog. Here's her new blog header:


And here is her blog button that you can snatch up for yourself right over here:


You like?

3.16.2011

ooshirts


I mentioned a few weeks ago that my dad is starting a new bbq business and wanted shirts made. After spending quite a long time searching for the cheapest tshirt printing place, I came across ooShirts.

Fantastic. I can't stress enough how great they were to work with. 

They have someone review your design (for free!) before you submit it. How great is that?

They also include shipping right into your order price, and guarantee that it will be on your doorstep in two weeks.

Their prices are very reasonable and I'd highly recommend them! The more tshirts you'll be printing, the price goes down.

3.15.2011

family pictures

We're kind of lame and haven't done any formal family pictures yet. In fact, Tyler and I haven't had formal pictures since our wedding 2 1/2 years ago. 
Here's the best we can come up with (for now):


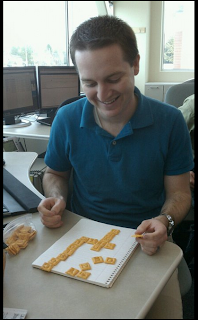
...and just for kicks here is Tyler, playing Cheezit Scrabble at work today:
photo via facebook / spencer bean

3.12.2011

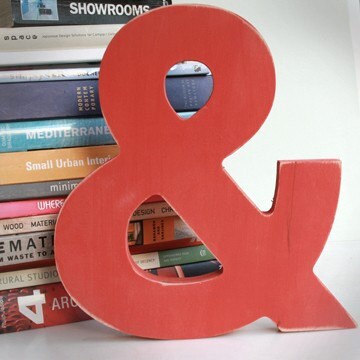
ampersand


uh, tyler? can i have this for my birthday?

please? i'm too scared to attempt my own mock cereal box version.

3.11.2011

Website Redesign

Guys! I'm FINALLY redoing my portfolio website

Hooray! Hooray!


It's kind of funny with design. You get really proud after you complete something but then you look back six months later and realize it sucks.

So is the case with my personal website.

It's kind of sad.


I learned once how to code it myself...over a year and a half ago.
And my husband codes websites so we can have a roof over our heads.


I think I'll leave it up to him to code it this weekend for me.
Until then, here's a sneak preview:


I can't wait to show you!! (plus I'll have more updated graphic design work in there! woo!)

3.10.2011


This is how I organize my spices. It's very convenient and easy to find exactly what I need.

I'm big on tubs and jars and boxes to organize things. I even have a box in my freezer filled with bags of vegetables. I decided several years ago to do the same thing to my spices. Now I just reach up and pull the entire tub down, find what I need, and put it back. No more digging through cupboards, knocking things over. This way I can see every spice that's in there and reach it easily.


So basically this was one of my best ideas ever. Ever.

Recipe Renovation


This, friends, is my little black book.

Okay, more like my giant black book. And it's filled with recipes instead of gentlemen's phone numbers. 


I just revamped and reorganized it completely. It makes me so happy to flip through it now! I'll take you on a tour:


The 1st section starts off with my weekly menu planner. I make a copy of this each week, and write down my menu and all of the ingredients I need to buy. Then this goes on the fridge by our calendar.
 Right after this I have some recipe inspiration lists. Two pages full of dinner ideas, so I can just spot something quickly that looks good.
After this I've got conversion charts and some cooking tips, and then a short (hopefully will become longer) baby food section. Recipes for homemade baby food. 


The 2nd section is chock full of my favorite recipes. If I hadn't made it in the past year or if it didn't sound healthy or appetizing anymore, I tossed it. Here's how my sections broke down:
-appetizers (dips, beverages, things I'll probably rarely make)
-main dishes (taco soup, fried chicken, pasta, caesar salad...)
-side dishes (green bean casserole, mashed potatoes, creamed corn, roasted broccoli)
-snacks (mostly lunch ideas, like my couscous salad)
-cookies (snickerdoodles, levain's chocolate chip, rootbeer cookies)
-desserts (chocolate bliss cheesecake, cinnamon rolls, brownies)
-breads (artisan bread, french bread, all sorts of yummy breads)
-breakfast (sour cream coffee cake, whole wheat pancakes, quiche)


Basically I grin every time I get to open it now. With an organized "black book", menu planning is so much simpler!